Connecting Arduino with a Node Server
Jan 1, 2018 · 1288 words · 7 minutes read
Arduinode
I’ve been working through the Arduino Starter Kit projects recently, and I wanted to try a new project that was outside of the pre-made booklet. Working with an offline Arduino (intranet of things?) has let me learn a great deal, and I wanted to see how difficult it would be to connect my Arduino to a simple Node server, which would get me ready to connect it in any future projects.
Since I’m most comfortable with JavaScript, I decided to create a simple connection between the Arduino and a Node server. Since a classic Hello, World Arduino project is to light up an LED, I decided I would make a very basic program that would send a button press from the Arduino to the server, which would then send an action response back to the Arduino to turn an LED on or off.
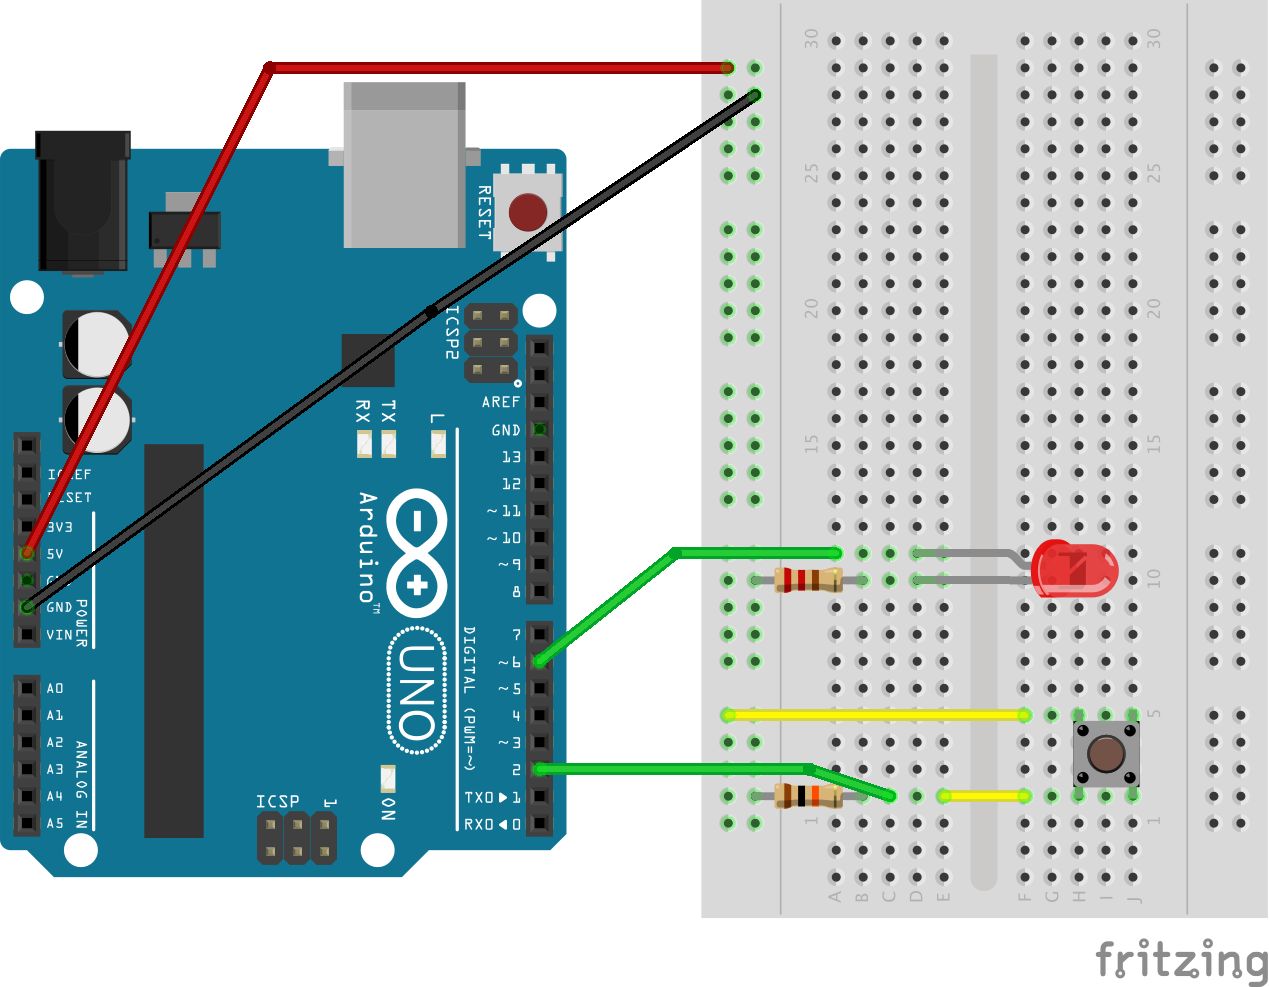
Here’s what the schematic looks like:
After a little research, I came across the serialport package, which would allow a simple connection between the server and the Arduino. Easy enough!
Hello, Arduino
My first test was to get an LED shining from a message from the Node server. I decided to keep it very simple and only send 1 byte at a time, either a 1 or a 0. For now, the server would send a 1, and the Arduino would turn the LED on. I started with very basic Arduino code:
/*
  project.ino
*/
int LEDPin = 6; // LED connected to pin 6
int incomingByte; // for incoming serial data

void setup() {
  // Initialize the LED pin to be an output
  pinMode(LEDPin, OUTPUT);
  // Give the pin low voltage, which turns the LED off
  digitalWrite(LEDPin, LOW);
  // Initialize the Serial connection
  Serial.begin(9600);
}

void loop() {
  // Check if we have a message available
  if (Serial.available() > 0) {
    // read the incoming byte:
    incomingByte = Serial.read();

    // If we have an incoming byte of 1, turn light on.
    if (incomingByte == 1) {
      digitalWrite(LEDPin, HIGH);
    }
  }
}
Not too bad! My server code was similarly simple. One thing to note is that there’s a slight delay between opening the Serial port and being able to send a message. Apparently when the port is opened, the Arduino code restarts, leading to a slight delay. I got around this by adding in a 2 second delay before the server sends the 1.
/*
  server.js
*/
// Import SerialPort
var SerialPort = require('serialport');

// Create a new connection with the correct path to the Arduino and a baudRate that matches
var port = new SerialPort('/dev/cu.usbmodemFD131', { baudRate: 9600 }, function(err) {
  if (err) {
    console.log('Error: ', err.message);
  }
});


// When the connection is open, send the Arduino a 1
port.on('open', function() {
  setTimeout(function() {
    port.write([1]);
  }, 2000);
});
After connecting and uploading the Arduino code, I started the server and the LED turned on!
Hello, Server
The next step was to get the Arduino talking to the server. Since I had the server to Arduino code already set, I added an event listener to the server that would listen for new data on the Serial port. I kept it simple, sending a 1 if it heard a 1 and a 0 if it heard a 0.
/*
  server.js
*/
var SerialPort = require('serialport');

var port = new SerialPort('/dev/cu.usbmodemFD131', { baudRate: 9600 }, function(err) {
  if (err) {
    console.log('Error: ', err.message);
  }
});


port.on('open', function() {
  // Add event listener for data
  port.on('data', function(data) {
    // Log the incoming data so we can see it
    console.log(data[0]);
    // If we get a 1, send a 1 back
    if (data[0]) {
      port.write([1]);
    } else {
      // Otherwise, send a 0
      port.write([0]);
    }
  });
});
Now, I needed to make the Arduino listen for a button press change. I kept track of the state of the switch, whether it’s open or closed, and the previous state. This allowed me to only send a message to the server when something new happened, instead of constantly sending messages. Essentially, pressing the switch down would send one message to the server, instead of many messages while the switch is open and many messages once the button was pressed down. Given how often the Arduino runs its loop, I wanted to keep the flow simple.
/*
  project.ino
*/
int LEDPin = 6;
int incomingByte; // for incoming serial data

// Initialize variables to show that button starts not pressed
int switchState = 0;
int previousSwitchState = 0;

void setup() {
  pinMode(LEDPin, OUTPUT);
  // Initialize the button pin to input
  pinMode(2, INPUT);
  digitalWrite(LEDPin, LOW);

  Serial.begin(9600);
}

void loop() {
  // Read the voltage coming in from the button
  switchState = digitalRead(2);

  if (switchState == HIGH && switchState != previousSwitchState) {
    // If the switchState is pressed and it didn't used to be, send message to server
    Serial.write(1);
    previousSwitchState = switchState;
  } else if (switchState == LOW && switchState != previousSwitchState) {
    Serial.write(0);
    previousSwitchState = switchState;
  }

  // Check if we have a message available
  if (Serial.available() > 0) {
    // read the incoming byte:
    incomingByte = Serial.read();

    if (incomingByte == 1) {
      digitalWrite(6, HIGH);
    } else {
      digitalWrite(6, LOW);
    }
  }
}
Now, inside the main loop, the Arduino will check if the button is pressed and if it’s different than the last time it checked. If it is different, it will send either a 1 or a 0 to the server. The server, seeing that 1 or 0, will respond appropriately, and the Arduino will then turn the LED on or off.
This worked! I then realized that it could be working because the Arduino is reading the byte that it just sent, which would mean that it was really bouncing these messages off of a mirror to turn the light on. As a sanity check, I stopped the node server, at which point the light stopped turning on or off. This left me confident that the server was in fact playing its role correctly.
All that was left was some refactoring to clean up the code:
/*
  server.js
*/
/*
  This is the very simple server code for listening to and responding to the arduino's button press.
  It listens for data from the arduino, and if it receives an ON signal, it returns an ON signal. Likewise for OFF.
*/
var SerialPort = require('serialport');
var PATH = '/dev/cu.usbmodemFD131';

var port = new SerialPort(PATH, { baudRate: 9600 }, function(err) {
  if (err) {
    console.log('Error: ', err.message);
  }
});

port.on('open', function() {
  port.on('data', function(data) {
    console.log(data[0]);
    if (data[0]) {
      port.write([1]);
    } else {
      port.write([0]);
    }
  });
});
/*
  project.ino
*/
/*
Setup:
  Initialize I/O pins
  Initialize Serial port
Loop:
  Check for button press change and send to server with Serial
  Check for incoming message and turn LED on/off accordingly
*/

int LEDPin = 6;
int incomingByte; // for incoming serial data
int switchPin = 2;
int switchState = LOW;
int previousSwitchState = LOW;

void setup() {
  pinMode(LEDPin, OUTPUT);
  pinMode(switchPin, INPUT);

  // Start with LED turned off
  digitalWrite(LEDPin, LOW);

  Serial.begin(9600);
}

void loop() {
  // Read button press
  switchState = digitalRead(switchPin);

  // Check previousSwitchState so we aren't constantly writing back and forth without a button change
  if (switchState != previousSwitchState) {
    Serial.write(switchState);
    previousSwitchState = switchState;
  }

  // Check if we have a message available
  if (Serial.available() > 0) {
    // read the incoming byte:
    incomingByte = Serial.read();
    digitalWrite(LEDPin, incomingByte);
  }
}
Next steps
This project served as a good way to test out the communication between Arduino and computer, and it was an easy way to get something up and running with serialport. With this project done, it’ll be very easy to integrate the Arduino into any future Node project.
You can see the full code on my GitHub page here.